Showing posts with label DIY & Tutorials. Show all posts

March 30, 2017

DIY SPICE MIXES


Making your own spice mixes is a lot easier than you think. By making your own you can really lessen your trash pile since you would be able to buy in bulk. Which allows you to control the chemicals you are consuming if you are buying from bulk stores. Bulk stores tend to support non-GMO and organic farmers. Now if you are growing your own spices and herbs, invest in a dehydrator (I am eyeing a solar one). This way you can truly control what you are putting into your body. Win win.

I've compiled a short list of commonly used spice & salt mixes.


POULTRY RUB 1
2 tsp Rosemary
1 tsp Sage
3 tsp Garlic Salt (**look at the salt list to learn how to make it yourself)
1 tsp Black Pepper
1 tsp Thyme

POULTRY RUB 2
(1 TB Each)
Garlic
Onion
Thyme
Salt
Paprika
Chili
Black Pepper

CURRY
2 tbsp Cumin
2 tbsp Coriander
2 tbsp Turmeric
1 ½ tsp Cardamom
½ tsp Cinnamon
¼ tsp Salt

LEMON PEPPER
Zest from 2 Lemons
2-3 tbsp Black Pepper
2 tbsp Salt

CHILI
2 tbsp Chili
1 tsp Cumin
1 tsp Coriander
1 tsp Cocoa (unsweet)
½ tsp Garlic
¼ tsp Cayenne
½ tsp Salt
1 tsp Paprika
1 tsp Smoked Paprika

TACO
2 tbsp Chili
2 tbsp Cumin
1 ½ tsp Onion
1 ½ tsp Garlic
½ tsp Cayenne
½ tsp Salt
½ tsp Black Pepper
½ tsp Oregano
1 tsp Paprika

ALLSPICE
1 tsp Nutmeg
2 tsp Cinnamon
1 tsp Clove

PUMPKIN PIE & SWEET POTATO PIE
2 tbsp Cinnamon
1 tsp Ginger
½ tsp Nutmeg
½ tsp All Spice
½ tsp Cloves

APPLE PIE
1 tbsp Cinnamon
dash Cardamom
1 tsp Nutmeg
½ tsp Cloves

SALTS
When making seasoned salts, you need to bake them a little to make sure the salt absorbs the flavors well. Line a baking sheet with parchment paper and spread your salt mixture. Bake at 200ยบ for 20-30 mins. You can use whatever salt you want, I choose to use a certain Kosher salt because it is the lowest in sodium
.

SEASONED SALT
1 cup Salt + (1 tsp of each) Garlic + Paprika + Black Pepper

GARLIC SALT
1 cup Salt + 2-3 Garlic Cloves

CHILI LIME SALT
1 cup Salt + 3 tsp red pepper flakes + 2 tsp lime zest

SRIRACHA SALT
1 cup Salt + 3 tbsp Sriracha

ROSEMARY LEMON SALT
1 cup Salt + 3-4 tbsp Rosemary + 1 Lemon zest

SAFFRON-FENNEL SALT
1 cup Salt + 1 tsp Saffron threads + 2 tsp Fennel seeds

LAVENDER SALT (excellent on cantaloupe)
1 cup Salt + 3 tsp Lavender buds

TRUFFLE SALT (so good over eggs) (Do not bake this mix. Let sit over time)
1 cup Salt + 1 small Truffle finely chopped + 3 tsp Truffle Oil

There are plenty of other combos. Feel free to make your own mix. The point is, there is no point is paying so much for chemical filled ones.

December 20, 2016

LAST MINUTE CHRISTMAS CRAFTS - KID FRIENDLY


For my last post of 2016, I wanted to bring you some easy least crafts you can do with the kids. These are great crafts that don't require much in order to make it work. Its really great if there are a bunch of family visiting for the holidays.

We are going to make felt, ribbon and toilet paper roll ornaments. Yes, you heard that right. Toilet paper rolls! Now, enjoy the craft and do t try to make everything perfect. Children's crafting imperfections are works of art! Let's get started.


TOILET PAPER ORNAMENTS


Supplies:
Paint
Toilet paper roll (1 per flower)
Glue (hot glue works the fastest)
String

Instructions:
Measure your roll and mark where to cut to make sure all petals are even. In the image each petal is 1/2 inch wide. Cut out your petals.

Paint inside and out if desired. Once fully dried glue together. If using regular glue or glue stick, use paper clips to hold in place while it sets.

Glue on your button in the center.

Once dry add glitter if desired. Tie your string around one petal and voila!


FELT ORNAMENTS


Supplies:
Any kind of felt in white, black, red- for snowman. Green- for the tree. (left over felt is perfect)
Beads or buttons in orange, black for snowman. Various colors for tree.(depending on size)
Thread and needle
Glue
String

INSTRUCTIONS:
Cut 2 - tree from green felt. Cut 2 - snow man from white felt, top hat from black. Cut one strip from red felt. Thus will be our scarf so just one strip will do.

Sew your beads or button to make the face and torso spots on the snowman and the "ornaments" for your tree.

Tree: create a loop with string and glue to the inside of the backside to the tree. Glue down the front of your tree and done!

Snowman: glue front and back of bottom part of snow man together. Glue head pieces together. Grab your red felt, glue the head and body slightly off centered onto the red strip. Take the shorter side and bring around the front to the opposite end, repeat with the rest of the scarf. You can do this any way you want, don't forget. These instructions are why I did. Now take your hat. Loop string and glue to the inside of the back piece of the hat. Glue to the back of your snowman's head. Glue other part of hat and you're done.

RIBBON ORNAMENTS


Supplies:
Ribbon (wide and thin, stiffer ribbon is perferred)
Needle
Embroidery Floss (more durable)
Beads

*If you don't want sharp needles around your kids, a blunt needle will work just fine. Just make sure your bead holes will fit the needle.

Candy Ribbon
This mimics those old fashioned ribbon candies. You can use more than one ribbon for a neat look.

Simple fold over your ribbon the same width, adding a bead in between.
Once you are at the end of your ribbon just create a loop at hang.

Tree:
This follows the same pattern as the candy, the only difference is as you create a new fold it needs to be slightly smaller than the last.
End with a bead different than the rest to create your tree topper, create a loop to hang and voila!

These are great to make as decorations for gifts as well. Super easy and fast.


This will be my last post for 2016. This year had a lot of ups and downs. More downs than ups, but that is okay. I think it prepped me for kicking 2017's butt! I will be back for the new year, with some new projects and updates for the blog and store. I hope you will still stick around and join me for the new year, and many years to come.

I wish you all a wonderful and blessed holiday. 

October 24, 2016

SCENT YOUR HOME WITHOUT CHEMICALS


I love having my home smell good. I find it comforting. However one issue I have is all the candles & sprays that are full of chemicals. You don't need all those wasteful items in your home and you certainly don't need those chemicals in your lung. Plus summer rains in Florida certainly doesn't smell like whatever is in those things!
Making your home smell good naturally isn't hard. You probably even have all the items you need already in your kitchen. All you need is some water, pot and various spices.

Here are 3 our favorite mixes that I make regularly.

Rosemary & Citrus (this is my every day scent)
-3-4 sprigs of rosemary
-peel of two lemons (or sliced lemons)
-couple of drops of vanilla extract

Festive Fall
-2-3 sticks of cinnamon
-1 tsp nutmeg peel of 1-2 oranges (or sliced oranges)
-1 tbsp whole clove star anise (optional)
*An alternative that works very well is swapping the oranges for 2-3 whole apples*


Winter Delight
-4-5 springs of pine (I ask where trees are sold if I can have some of the broken off pieces)
-2-3 bay leaves 1 tsp of nutmeg


Once you have gathered your ingredients stick them in a pot and cover with water. Bring mix to a boil, then lower to a simmer. You can either leave it on the stove and add water as it evaporates, or you can pour the fresh hot mixture into a mason jar and place around the home. You will have to reheat on the stove or in a microwave throughout the day. When not in use you can save it in the fridge and reheat when needed. The mixture will last about a week before the smell begins to become odd. Once you are all done just toss the mixture into the compost or bury directly in the ground if you don't have a compost.

I like to use the peels so they don't go to waste since the best smell comes from the peels.

What is your favorite scent combination? How do you plan on using this simple room freshener?

June 20, 2016

MIYM – UPCYCLED SHELF


So I had a raised garden bed. Had being the keyword here. The ants ruined it. It was made of ceder planks so I thought I'd be okay concerning bugs such as termites which are big around these parts. I never once thought about the ants. I did think about the big carpenter ants when get but they don't like cedar, I truly never thought that regular red ants would wreck havoc on my raised bed.

Before: Rot & Bug Stuff Galore


They ate and dug away so much of the raised bed it looked like termites ran through it. When I gave it a good look, no termites. Just ants. Finding shelter from rain. Perfect place for them. Sigh. I was upset and sad because I was getting ready to clean it out and put new soil in for new seedlings. But there was nothing I could do. So I kept the planks just wondering if they can be salvaged. Luckily I was able to save 7 out of 8 planks. I decided on a shelf. I have been wanting one for my craft table to house finished products and use for photos. Instead of spending $30 and up for compressed saw dust ones, I have an opportunity to make my own. Now, I have never built anything before. I have followed instructions and put stuff together, but never actually built something. Here was my chance. It isn't perfect my any means, but I love it. I love the rustic look, I love how it looks against the white wall, I love that I did it on my own. It could have been done in a day for someone who is familiar with this kind of stuff but I was new to it and was feeling a little under the weather so it took the whole weekend. Which I still don't think is that bad for a newbie.

You don't have to use old planks you can easily visit your hardware store and get some new ones, but it's kinda nice to prevent something from going into the trash.

Here are the dimensions for my shelf. There really is not right or wrong way to put this together. So don't worry about instructions.

30 in x 20 in x 7 in
I have shelves at the 10 inch, 20 inch and 30 inch (top) mark

Quick Info:
I used a regular wood saw, wood screws, and sand paper
Planks are 3 ½ inches wide. Adjust your shelf according to how deep you want it to be based off the width of the planks your choose.

Side Planks (4) – 30 inches long
Shelves (6) – 20 inches long
*Shelf Supports (4) 7 inches x 1 ½ inches : You can opt for L brackets or no supports if you won't have heavy objects on it.

After: Cleaned & Cut


Tips:
Measure twice! One thing I learned is the saw will cut away more than you think. So for the shelf to be 20 inches be sure to mark a second line at 21 inches less or more depending on the thickness of your saw.

Sand EVERYTHING before putting it all together. It's so much harder to do it afterwards. If you decide to paint do one coat prior to putting everything together.

Pilot holes are you friend. Trust me. It will really help screwing the pieces together. Makes the process much faster.

That's really it. Just decide how you want your shelves to be and that's it.

What have you upcycled recently? Share some photos with us in the comments below!


April 18, 2016

MIYM - HOMEMADE CHICKEN TACOS


This recipe is a simple one that can be done as a freezer meal. It is a modification of this recipe:

Ingredients:
1 1/2 pounds boneless, skinless chicken breast
1/2 teaspoon salt
1/2 teaspoon pepper
2 tablespoons olive oil
2 teaspoons ground cumin
1 teaspoon smoked paprika
1/2 teaspoon chile powder
1/2 teaspoon garlic powder
1/2 teaspoon onion powder
2 Roma tomatoes, diced
¼ – ½ cup chicken broth

8 to 12 (4-inch) tortillas, flour or corn . I used flour and they were homemade using this recipe:
4 ounces cheddar cheese, crumbled
Fage plain yogurt in place of sour cream. Feel free to use sour cream if you want.

I chose to cook it in a crock pot. Next time I will follow the instructions from the original receipe and roast it. I think you will get a better flavor. We shall see!

Directions:
Chicken – Combine all ingredients into a crock pot and set on high. Depending on your crock pot will depend on how long it cooks. It took 3 hours for me.

Once cooked take the chicken out and shred. Just grab two forks and grab and pull in all directions. Add the chicken back to the crock pot so it can soak up some more of the juices. You can turn it off or set it to low at this point. If you haven't made your tortillas, go ahead and do so. They do not take long to make.

ENJOY!

How do you like your tacos? Corn or Flour? Hard or Soft? Let me know.

April 11, 2016

MAKE IT YOURSELF MONDAY – HUMMUS


I love hummus. It's a great go to snack that has some protein in it. I love the different variations you can do with hummus. My ultimate favorite is the basic garlic hummus. Why make it yourself? Well you can control the quality of the ingredients. You can control the sodium levels. Plus you can make small batches if you only snack on it like me. It is cheaper in the long run too. Which is great if you are a big hummus eater. Hummus is a very easy and fast dish to make. All you really need is a food processor. You don't even need a big fancy one either!

Did you know that chickpeas are not only yummy but they have some awesome health benefits.

Health Benefits of Chickpeas

Fiber Advantage and Weight Loss: Like other beans, Chickpeas, are rich in both soluble and insoluble dietary fiber. Soluble fiber forms a gel-like substance in the digestive tract that snares bile (which contains cholesterol) and ferries it out of the body. Research studies have shown that insoluble fiber not only helps to increase stool bulk and prevent constipation, but also helps prevent digestive disorders.
Protein for Vegetarians: Chickpeas are a good source of protein. Combined with a whole grain such as whole-wheat protein, they provide amount of protein comparable to that of meat or dairy foods without the high calories or saturated fats.
Manganese for Energy Production: Garbanzos are an excellent source of the trace mineral manganese, which is an essential co-factor in a number of enzymes important in energy production and antioxidant defenses. Just one cup of garbanzo beans supplies 84.5% of the daily value for this mineral.
Iron Boost: Garbanzos can boost your energy because of their high iron content. This is particularly important for menstruating women, pregnant or lactating women and growing children. Iron is an integral component of hemoglobin, which transports oxygen from the lungs to all body cells, and is part of key enzyme systems for energy production and metabolism.
Stabilizing Blood Sugar and Low Glycaemic Index (GI): Soluble fiber helps stabilize blood sugar levels. If you have insulin resistance, hypoglycemia or diabetes, beans like garbanzos can help you balance blood sugar levels while providing steady, slow-burning energy. They have low GI value of 28 – 32 means the carbohydrate in them is broken down and digested slowly. This is helpful for weight loss as it controls appetite.
Heart Healthy: Regular intake of Chickpeas can lower LDL (bad) and total cholesterol. Garbanzos contain the significant amounts of folate and magnesium. Folate lowers the levels of the amino acid, homocysteine and strengthens the blood vessels. Studies have found chickpeas lower the risk of heart attack
For Women: Garbanzo contain phytochemicals called saponins, which can act as antioxidants. It could lower the risk of breast cancer, protect against osteoporosis and minimizes hot flushes in post-menopausal women.
Weight Loss: Due to high fiber content and low GI, chickpeas are excellent for weight loss diets. Salad with chickpeas are tasty and can keep you full longer, controlling the appetite.


Here is the basic recipe I followed:
1 cup chickpeas
a clove of garlic
½ tsp salt
2 tbsp olive oil

Instructions:

1. Soak chickpeas for 6 hours or more.

2. Cook for 60 - 90 minutes until it softens.

3. Put the cooked chickpeas into a food processor. add garlic, salt and olive oil then blend well. add chickpea juice as needed.

And that is that. Add to a sandwich in lieu of mayo. Cut up some veggies and use as a dipping sauce. Or just eat it as is!

Here are some other great recipes for making your own hummus.


Are you a fan of hummus? What ways have you incorporated it into your diet? Let me know in the comments below!

April 4, 2016

MAKE IT YOURSELF MONDAY - SUGAR SCRUB


You know those wonderful yet expensive sugar scrubs that make you ooo and ahh? Did you know you can make them yourself? For cheap and the items you usually keep in your home at all times! Imagine that! Custom sugar scrub whenever you want. Now sugar may not be good for you internally but your skin loves it. Why? It's a great exfoliate that is gentle yet effective. Its fine texture gently exfoliates the skin without leaving harmful residue that can clog the pores. Skin exfoliation removes dead skin cells, dirt and excess oil without drying the skin. It can help reduce problems with your feet, such as calloused and cracked heels. It's great for your elbows with calloused skin as well. 

Ready to give it a try?

My Basic Recipe:
½ cup sugar (I prefer brown sugar but white sugar is fine and cheaper)
2 – 3 tablespoons oil (olive, coconut, jojoba, almond all excellent choices)
2 – 3 tablespoons Aloe

That's it. That's the base, now the fun comes in....

Rosemary Sugar Scrub
½ cup sugar
2 -3 tablespoons oil
2 -3 tablespoons Aloe
Ground Dried Rosemary
Rosemary Extract

Lemon Sugar Scrub
½ cup sugar
2 -3 tablespoons oil
2 -3 tablespoons Aloe
Lemon Extract

Energizing Sugar Scrub
½ cup sugar
2 -3 tablespoons oil
2 -3 tablespoons Aloe
2 – 3 tablespoons coffee grounds

Honey Vanilla Sugar Scrub
½ cup sugar
2 -3 tablespoons oil
2 -3 tablespoons Aloe
2-3 tablespoons Honey
Vanilla extract

There are so many more you can make just have fun with it!

Do you use sugar scrubs? What's your favorite recipe? Tell me in the comments! Also every Monday is now Make It Yourself Monday. 

March 18, 2016

MAKE YOUR OWN SHOPPING BAG

make your own shopping bags


I love the fact more and more people are using reusable bags when shopping. It is amazing how much waste you prevent buy using your own bags. Even though paper bags are better than plastic, the fact remains many people still don't or can't compost so where does the paper go? Garbage. I hope recycling but again either people just don't or they don't have it set up in their area. So it still creates waste plus it creates a need to cut down more trees.

Making your own bags is very easy. You don't even need a fancy machine. You can buy one of those tiny ones. You just need to make straight(ish) lines. So go grab some old sheets, or go buy some fabric. The choice is yours. Get yourself some ribbon for handles and you are ready to go. I used lefter over ribbon and 2 old night gowns (which is why they are so thin).

make your own shopping bag - bag 1
BAG 1


This is the easiest bag to make. I tend to use this size for farmers markets or light weight items such as veggies. This is easily adjusted. I don't do super long handles because I don't carry the bags from my shoulders. So the length is purely for looks.

Materials:
2 - 13 inch x 13 inch pieces of fabric.
2 pieces of cut ribbon, length is up to you.

Before sewing, be sure to mark your seam allowance ¼ or ½ it's your choice. ¼ is more common.

  • Step 1: Sew the top of each piece to create your first hemmed edge.
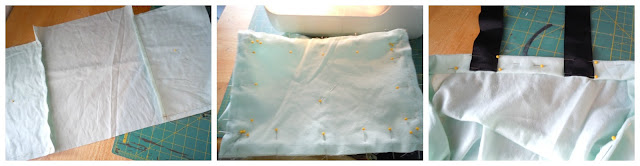
  • Step 2: Line up your ribbon on the right side of each of the pieces of fabric. Pin then down so they don't shift when sewing. Sew them in place. For added strength you can sew an X at the top of each bag. Just gives a little something extra visually to the ribbon as well.
  • Step 3: Now place your two pieces of fabric right sides together. Pin then down so they don't shift when sewing. Now sew the two pieces together.
  • Step 4: Trim any excess fabric once all sides are sewn.
  • Step 5: This is purely optional. Create a flat corner with the fabric as shown in the image above measure in ½ – ¾ inches in. Pin then sew. Repeat on the other side and then cut the excess fabric. This creates sort of a flat bottom. I just like the look.


make your own shopping bags - bag 2
BAG 2


Now Bag 2 is normally used for boxier or heavier items.

Materials:

2 - 11 inches x 11 inches pieces of fabric (I added a couple inches so my ribbon could have more fabric to sew into for stability. It is optional.)
3 – 11 inches x 7 ½ inches pieces of fabric
2 strips of ribbon in length of your choice.

  • Step 1: Take one of the 11 x 11 pieces of fabric and a 11 x7 ½ fabric and sew together. Repeat on the other side.
  • Step 2: Take add the second 11 x 11 piece of fabric creating an open box.
  • Step 3: Now we will add out bottom piece which is the 3rd 11 x 7 ½ fabric. Be sure to add extra stitching to the corners for stability.
  • Step 4: Pin down your hem and add the ribbon. Sewing all the way around. (I chose to add more fabric to the front and back so the ribbon had more to connect to given the thinness of the fabric. You do not have to do this.)


For added strength you can sew an X at the top of each bag. Just gives a little something extra visually to the ribbon as well.

That is it. I suggest using stronger fabric of course. This was just as an example.

Here are a couple of other places that make some cute bags. I will be making some based on their instructions. I really like the simplicity and look of them.


Do you use fabric bags? How do you like them? Why did you decided to use them? I'd love to hear your thoughts. Let me know is the comments. Thanks!

November 2, 2012

DIY Decor on the Cheap - Frames

So I decided to start a new regular blog post about diy decor but reusing what you have and/or spending as little money as possible. The first installment is Frames!


(1) Gather your materials. 
Frames ($2 from Wal-Mart), Glue, Fabric, Scissors, Brush, Cat, (Not shown paint, hot glue gun, buttons for establishments)
You can use whatever materials you want. As crafters we tend to have these items on hand. Try not to buy anything, search your home first and see what you have! I did not have any frames I was wiling to separate from their pictures so I did end up getting some from wal-mart.

(2) If you are not going to cover your frames with fabric or the fabric you will choose is sheer, paint your frames. I used white at first but changed my mind. I ended up painting on with Martha Stewart's Craft Paint in Blue Sky Satin Finish. Covers well even on these crappy plastic frames.

(3) Cover in fabric, embellish, etc. However you want. Lay your items out prior to gluing to make sure you like what you see. I ended up covering one in a burlap like fabric and adding buttons. The frame I ended up painting blue I added doilies to the corners. And voila!


 (4) Please note. With some frames they won't fit the glass anymore when adding fabric. I decided to remove mine and store them for later use. I added these fantastic printables from: www.AnythingbutPerfect.com

*This craft took make 30 mins all together, mostly waiting for paint to dry. I did use hot glue gun to hold down the buttons and the doilies. The awesome thing is, if I decide I don't like it anymore, I can just take everything off and reuse it all!


March 5, 2012

DIY Lentil Sprouts!


Ok so I came across a picture of Pinterest of some beautiful lentil sprouts. They looked so delicious. Just yum! Around here the stores (maybe Whole Foods) carries them only alfafa and some other sprouts. As I looked more at the post I noticed there was a link! Well I love clicking links so off I went. Where did I land?


A diy lentil sprout post. You have got to check it out and give it a try. Took a little over a week for me. I keep lentils in my cupboard so I will be making sure I have these sprouts year round. I had them on a sandwich, salad and some chicken soup. So fantastic! Plus they are pretty to look at. I might start keeping a mix of sprouts.


August 28, 2010

diy dry erase boards

I came across a site not too long ago that showed how to re-purpose picture frames for dry erase boards. I personal love this because some dry erase boards over time won't erase completely unless you use those mr.clean pad things that seem to clean everything. Those freak me out by the way. I still have yet to find out what they are made of... o.O Anyway here is the site, and below are a couple snapshots of 2 I did. Didn't take long. I made it simple because I plan on adding some fabric flowers to the small one in the kitchen and some more feathers to the one in my spawns room. I chose brown packing paper because well its simple. I like simple. If I come across some awesome fabric or paper (upcycled of course) then I can just switch it out.

You will need:
Glue, Tape or Hot Glue Gun
Fabric or Wrapping Paper
Any frame of your choosing
Scissors (if you need to trim stuff down)
Creativity


Once you combine this you get:


Yes a little boring but they will do for now.

Related Posts Plugin for WordPress, Blogger...