

I love the fact more and
more people are using reusable bags when shopping. It is amazing how
much waste you prevent buy using your own bags. Even though paper
bags are better than plastic, the fact remains many people still
don't or can't compost so where does the paper go? Garbage. I hope
recycling but again either people just don't or they don't have it
set up in their area. So it still creates waste plus it creates a
need to cut down more trees.
Making your own bags is very
easy. You don't even need a fancy machine. You can buy one of those
tiny ones. You just need to make straight(ish) lines. So go grab some
old sheets, or go buy some fabric. The choice is yours. Get yourself
some ribbon for handles and you are ready to go. I used lefter over
ribbon and 2 old night gowns (which is why they are so thin).
 |
| BAG 1 |
This is the easiest bag to
make. I tend to use this size for farmers markets or light weight
items such as veggies. This is easily adjusted. I don't do super long
handles because I don't carry the bags from my shoulders. So the
length is purely for looks.
Materials:
2 - 13 inch x 13 inch pieces
of fabric.
2 pieces of cut ribbon,
length is up to you.
Before sewing, be sure to
mark your seam allowance ¼ or ½ it's your choice. ¼ is more
common.
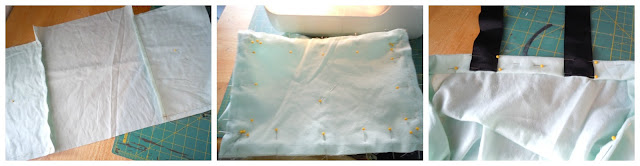
- Step 1: Sew the top of each piece to create your first hemmed edge.
- Step 2: Line up your ribbon on the right side of each of the pieces of fabric. Pin then down so they don't shift when sewing. Sew them in place. For added strength you can sew an X at the top of each bag. Just gives a little something extra visually to the ribbon as well.
- Step 3: Now place your two pieces of fabric right sides together. Pin then down so they don't shift when sewing. Now sew the two pieces together.
- Step 4: Trim any excess fabric once all sides are sewn.
- Step 5: This is purely optional. Create a flat corner with the fabric as shown in the image above measure in ½ – ¾ inches in. Pin then sew. Repeat on the other side and then cut the excess fabric. This creates sort of a flat bottom. I just like the look.
 |
| BAG 2 |
Now Bag 2 is normally used
for boxier or heavier items.
Materials:
2 - 11 inches x 11 inches
pieces of fabric (I added a couple inches so my ribbon could have
more fabric to sew into for stability. It is optional.)
3 – 11 inches x 7 ½
inches pieces of fabric
2 strips of ribbon in length
of your choice.
- Step 1: Take one of the 11 x 11 pieces of fabric and a 11 x7 ½ fabric and sew together. Repeat on the other side.
- Step 2: Take add the second 11 x 11 piece of fabric creating an open box.
- Step 3: Now we will add out bottom piece which is the 3rd 11 x 7 ½ fabric. Be sure to add extra stitching to the corners for stability.
- Step 4: Pin down your hem and add the ribbon. Sewing all the way around. (I chose to add more fabric to the front and back so the ribbon had more to connect to given the thinness of the fabric. You do not have to do this.)
For added strength you can
sew an X at the top of each bag. Just gives a little something extra
visually to the ribbon as well.
That is it. I suggest using
stronger fabric of course. This was just as an example.
Here are a couple of other
places that make some cute bags. I will be making some based on their
instructions. I really like the simplicity and look of them.
Do you use fabric bags? How
do you like them? Why did you decided to use them? I'd love to hear
your thoughts. Let me know is the comments. Thanks!
No comments :
Post a Comment